Free amigurumi pattern
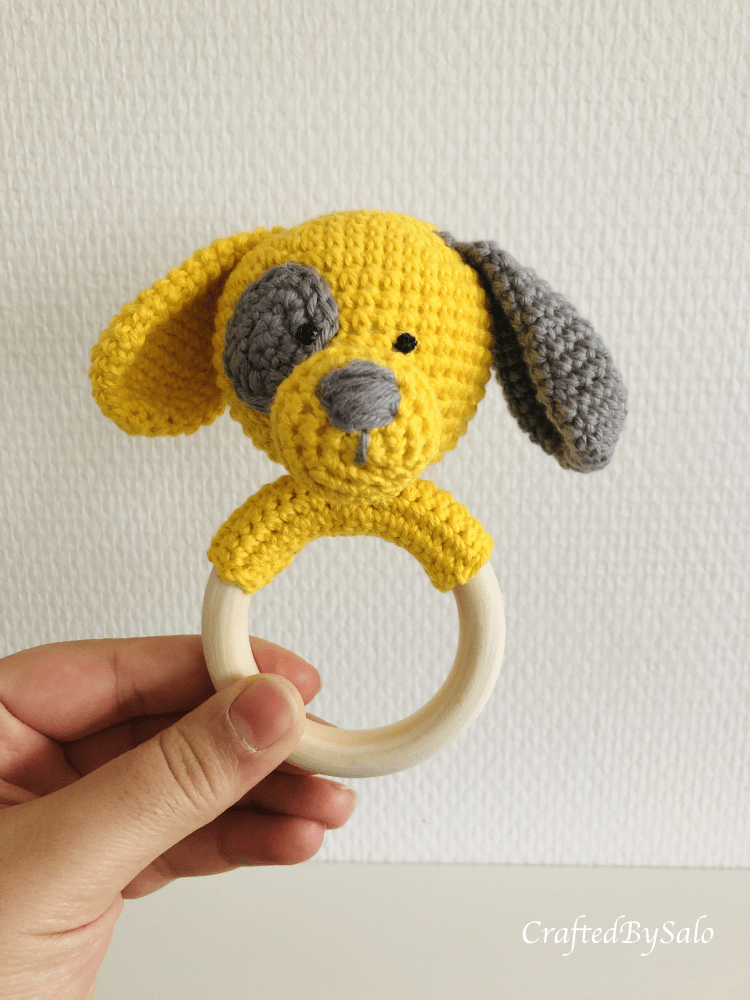
This little rattle dog is a perfect gift for a newborn or a baby up to one year old. It is relatively easy and fast to make, and most importantly, it looks adorable. When it is made from the supplies I used, the toy measures approximately 12 cm in length. I hope that you will enjoy working on the project.
I would love to see the toys that you make using this pattern. Please share the pictures with me on Facebook or Instagram @craftedbysalo
Skill Level
- Easy
Abbreviations
- st = stitch
- sc = single crochet
- ch = chain
- dc = double crochet
- inc = increase (2 sc in one st)
- dec = decrease (2 sc together)
- […] = total number of stitches (numbers in the squred brackets after each round)
- (…) = repeat the instructions in the brackets

Supplies Needed
- 3.5 mm crochet hook
- Cessors
- Needle for sewing
- Fiberfill
- Drops Loves You 7, 8/4, Yellow Uni Colour 09, 100% cotton yarn
- Anna & Clara’s, 8/4, grey #17-5102, OEKO-TEX quality 100% cotton yarn
- Black yarn for embroidering eyes
- Stich marker
- Pins
- Rattle disc, 3cm in diameter, 1 cm hight
- Wooden ring with an outer diameter of 6.5 cm, and an inner diameter of 5.5 cm
Head

R1 6 sc in magic ring [6]
R2 (inc) repeat 6 times [12]
R3 (sc in 1 st, inc) repeat 6 times [18]
R4 (sc in 2 st, inc) repeat 6 times [24]
R5 (sc in 3 st, inc) repeat 6 times [30]
R6 (sc in 4 st, inc) repeat 6 times [36]
R7 (sc in 5 st, inc) repeat 6 times [42]
R8-R14 sc in all 42 st [42]
R15 (sc in 5 st, dec) reapet 6 times [36]
R16 sc in all 36 st [36]
R18 sc in all 30 st [30]. Start filling the head with a little bit of the fiberfill, insert the rattle disc, and continue stuffing with the fiberfill as you continue crocheting.
R19 (sc in 3 st, dec) repeat 6 times [24]
R20 (sc in 2 st, dec) repeat 6 times [18]
R21 (sc in 1 st, dec) repeat 6 times [12]
R22 (dec) repeat 6 times [6]
Sew the front loops of the 6 stitches together to close the hole. Leave the long yarn tail for sewing.
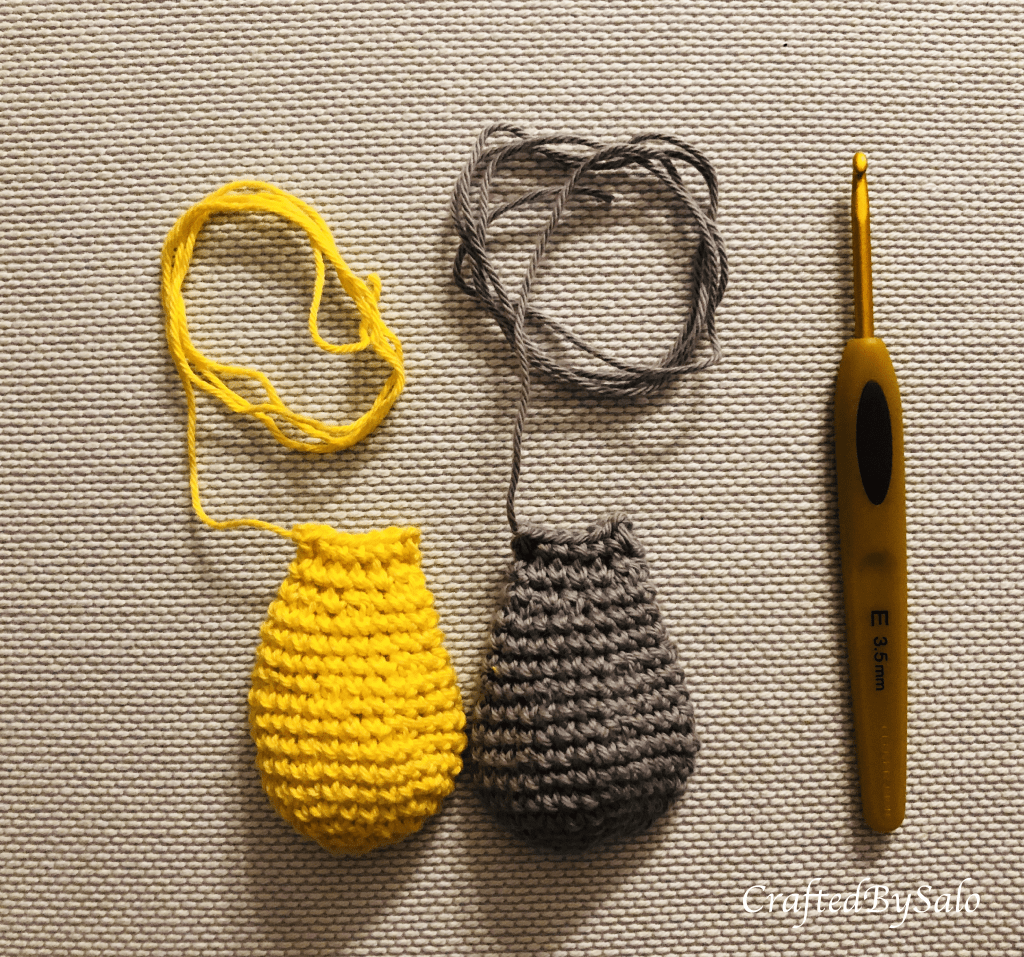
Muzzle

R1 6 sc in magic ring [6]
R2 (inc) repeat 6 times [12]
R3 (sc in 1 st, inc) repeat 6 times [18]
R4 (sc in 2 st, inc) repeat 6 times [24]
R5 sc in all 24 st [24]
R6 (sc in 2 st, dec) repeat 6 times [18]
R7 (sc in 4 st, dec) repeat 3 times [15]
Finish with the slip stitch, leave a long yarn tail for sewing, and stuff the muzzle with fiberfill.
Ears (make one in grey, one in yellow)
R1 6 sc in magic ring [6]
R2 (inc) repeat 6 times [12]
R3 (sc in 1 st, inc) repeat 6 times [18]
R4 (sc in 2 st, inc) repeat 6 times [24]
R5 (sc in 3 st, inc) repeat 6 times [30]
R6-R7 sc in all 30 st [30]
R8 (sc in 3 st, dec) repeat 6 times [24]
R9-R10 sc in all 24 st [24]
R11 (sc in 2 st, dec) repeat 6 times [18]
R12-R14 sc in all 18 st [18]
R15 (sc in 1 st, dec ) repeat 6 times [12]
R16 sc in all 12 st [12]
Ch 1 turn the ear around, and sc 6 st through both sides of the ear. Leave a long yarn tail for sewing.
Eye patch

Use the grey yarn.
R1 6 sc in magic ring [6]
R2 (inc) repeat 6 times [12]
R3 ch2, 2 dc in the next 2 st, 1 sc in the next 2 st, inc, 1 sc in the next 2 st, inc, 1 sc in the next 3 st. Finish with a slip stitch and leave a long yarn tail for sewing [16].
The rectangular part around the ring

Row 1 ch 20 st [20]
Row 2 starting from the second loop from the hook, sc in 19 st [19]
Row 3 ch 1 st, turn the piece around, and sc in all 19 st [19]
Repeat this 6 more times (Row 4- Row 9).
I used the wooden ring with an outer diameter of 6.5 cm, and a thickness of 1 cm. If you have a different size wooden ring, you can easily change the number of stitches or rows to achieve the desired look. It is important though, to have a very tight fit around the ring.
Assembly

- Start by sewing the rectangular part around the ring, as shown in the top left picture. The result should look as shown in the top right picture.
- Sew the head in the center of the yellow part of the ring.
- Pin the muzzle, the eye patch, and ears to the head. I positioned the muzzle between the rounds 13 and 18, the eye patch between the rounds 8 and 15, and the ears between the rounds 5 and 6.
- Sew the different parts to the head.
- Using grey yarn embroider nose on the muzzle.
- Embroider eyes using black yarn.
Copyright:
This is an original design of CraftedBySalo, therefore please give the credit to CraftedBySalo when using the pattern. You may crochet the toy for personal use, or you may sell limited numbers of finished copies. You may share the link, but you may not copy and sell the pattern.
